前回の記事では、UnityでiOS向けのARアプリを開発するための環境構築を解説しました。
今回は、AR Foundationを使って深度画像から点群データを取得する方法を紹介します。
iPhone ProやiPad ProはLiDARスキャナと呼ばれるセンサを搭載しています。
これを使って空間の深度情報を取得できます。
この記事では、こうして取得した深度画像から3次元点群データを取得する方法を紹介します。
各種バージョン情報
この記事で使用する各種ツールは以下のバージョンを使用します。
- Unity … 2022.3.11f1
- Unity Hub … 3.6.1
- AR Foundation … 5.1.1
- Apple ARKit XR Plugin … 5.1.1
深度画像を取得するスクリプトファイルを作成する
はじめに、LiDARセンサから深度画像を取得して保存するためにC#スクリプトを作成します。
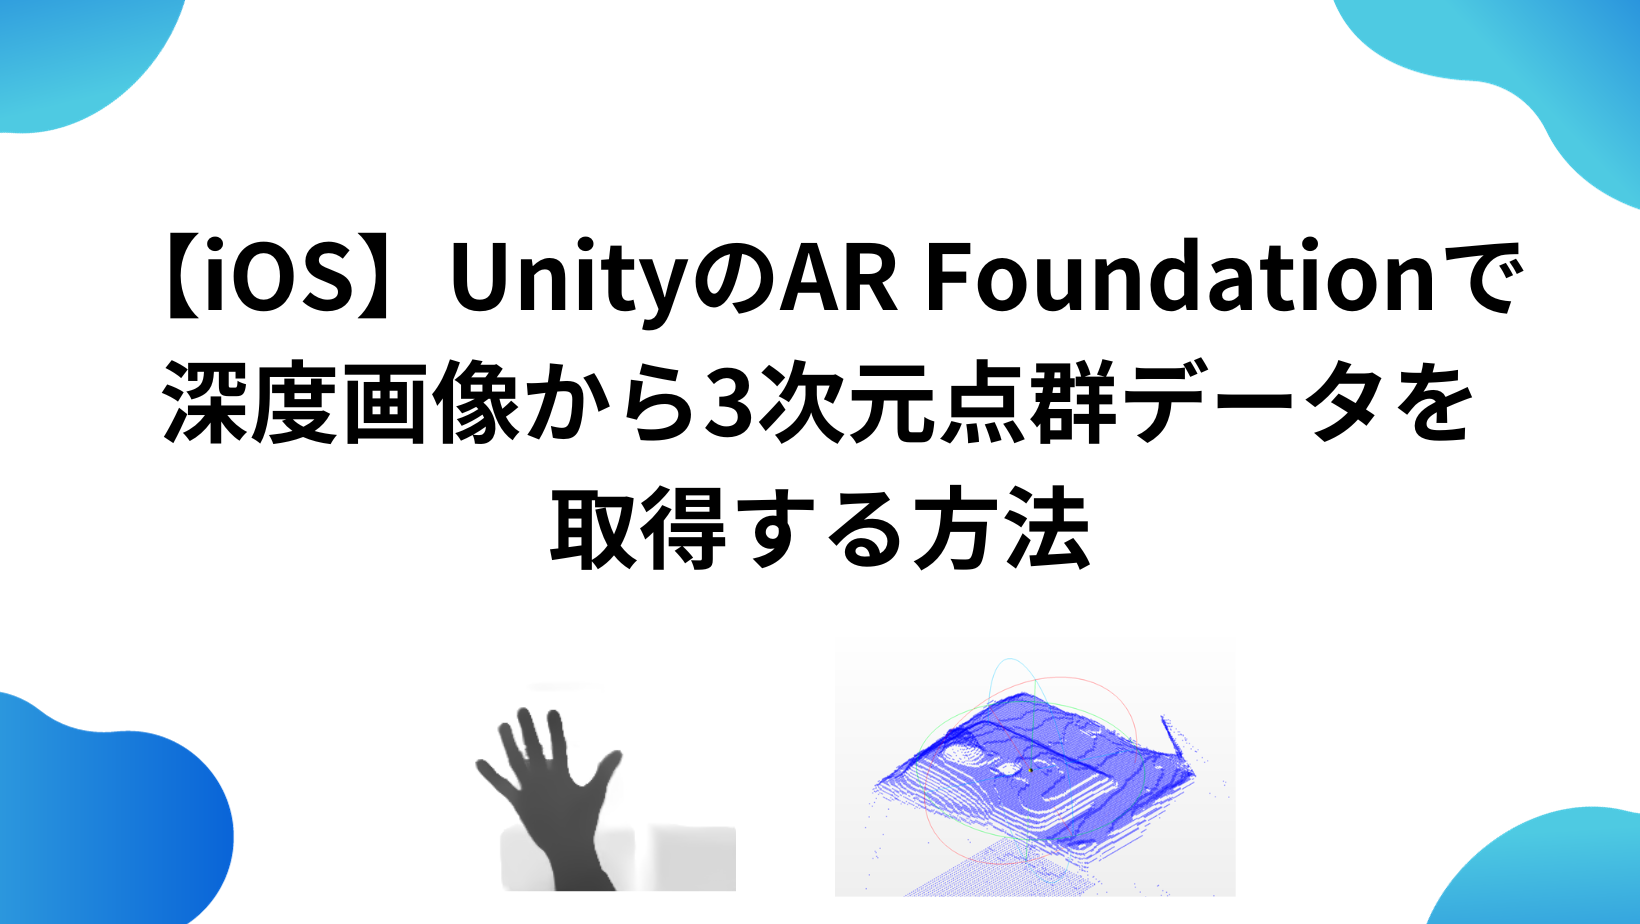
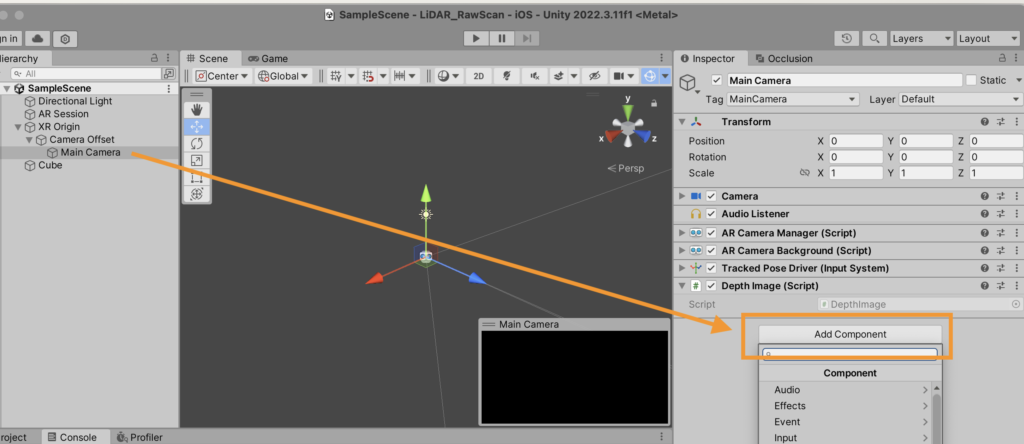
「Hierarchy」から「XR Origin」→「Camera Offset」→「Main Camera」を選択します。
画面右側の「Inspector」の一番下にある「Add component」ボタンをクリックします。
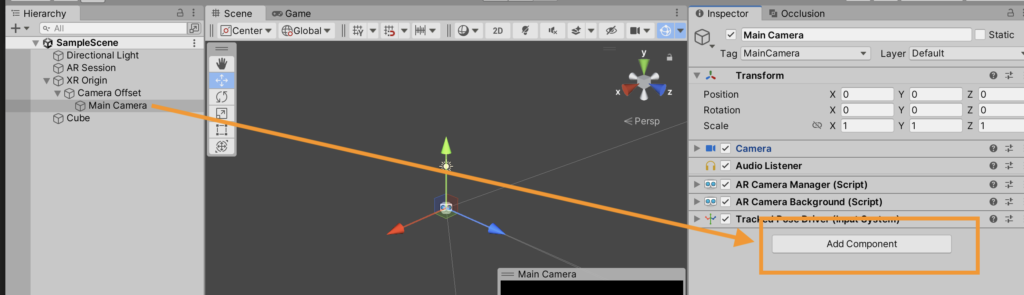
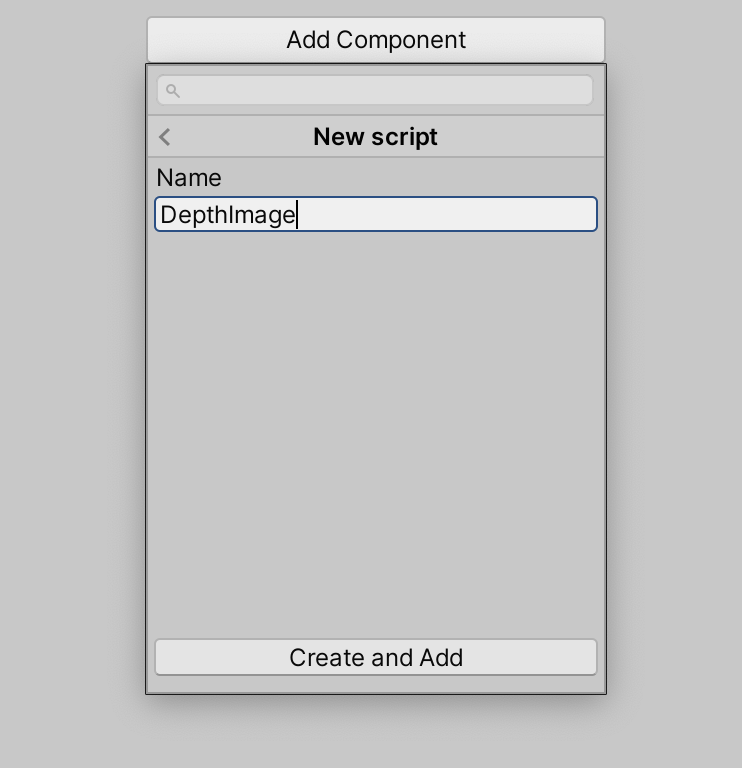
「Component」→「New script」を選択します。
「Name」を「DetphImage」と設定して「Create and Add」をクリックします。
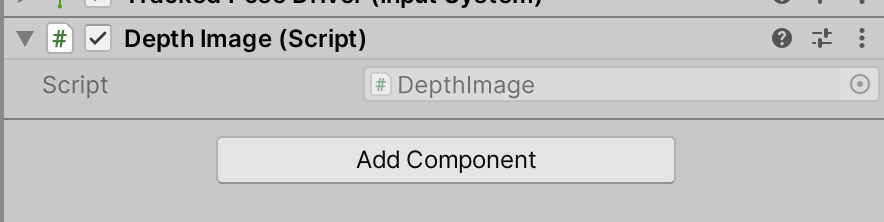
「Inspector」の下部に「Depth Image (Script)」というコンポーネントが追加されていればOKです。
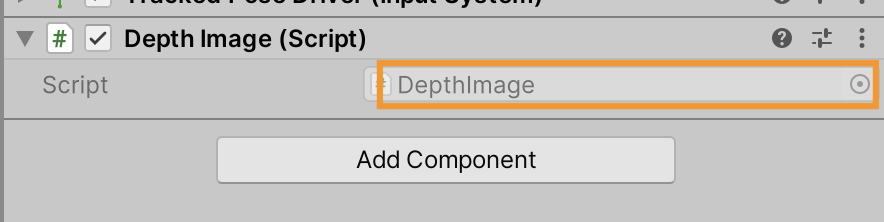
「Script」の横にある「DepthImage」という部分をクリックして、エディタでスクリプトファイルを開きます。
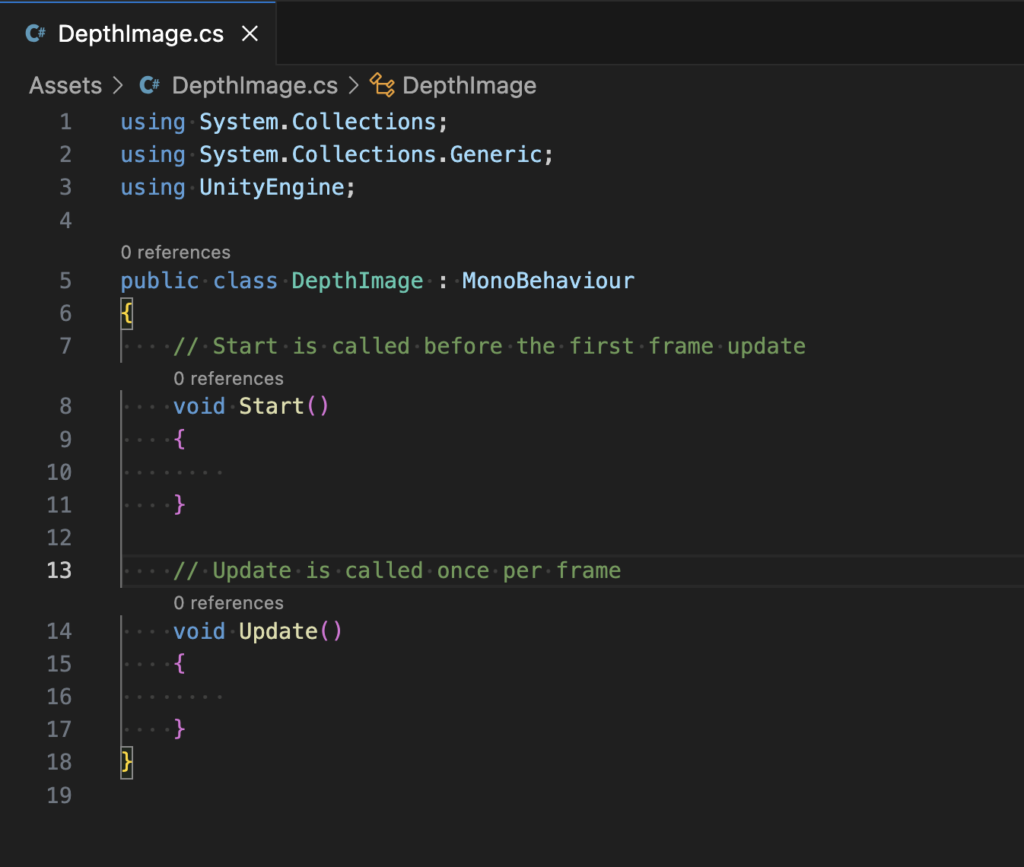
このようにC#スクリプトが開きます。
深度画像を取得するスクリプトを実装
まずは深度画像を取得できることを確かめましょう。
次のようにコードを書きます。
using UnityEngine;
using UnityEngine.XR.ARFoundation;
using UnityEngine.XR.ARSubsystems;

[RequireComponent(typeof(AROcclusionManager))]
public class DepthImage : MonoBehaviour
{
    private AROcclusionManager occlusionManager;

    void Start()
    {
        occlusionManager = GetComponent<AROcclusionManager>();
    }

    void Update()
    {
        if (occlusionManager != null)
        {
            XRCpuImage depthImage;
            if (occlusionManager.TryAcquireEnvironmentDepthCpuImage(out depthImage))
            {
                using (depthImage)
                {
                    Debug.Log($"DepthImage: {depthImage.width}x{depthImage.height}");
                }
            }
        }
    }
}クラスの先頭に[RequireComponent(typeof(AROcclusionManager))]とあるように、このスクリプトはAR Foundationの機能のひとつである「AROcclusionManager」に依存しています。
「AROcclusionManager」はiOSデバイスが取得する深度画像にアクセスするためのコンポーネントです。
AROcclusionManagerの「TryAcquireEnvironmentDepthCpuImage」メソッドを呼び出せば、スクリプトから深度画像を取得できます。
ここでは深度画像が取得できることを確認するため、depthImageの幅(width)と高さ(height)をログ表示しています。
スクリプトを保存したらUnityエディタの画面に戻ります。
AR Occlusion Managerの追加
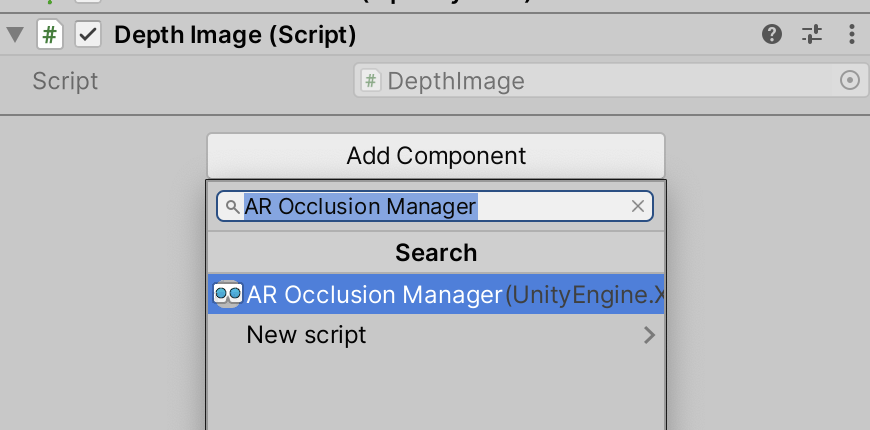
先ほどのスクリプトは「AR Occlusion Manager」に依存するので、これを追加して参照できるようにします。
「Hierarchy」から「XR Origin」→「Camera Offset」→「Main Camera」を選択して、画面右側にある「Inspector」の「Add component」ボタンをクリックします。
「AR Occlusion Manager」を検索して選択します。
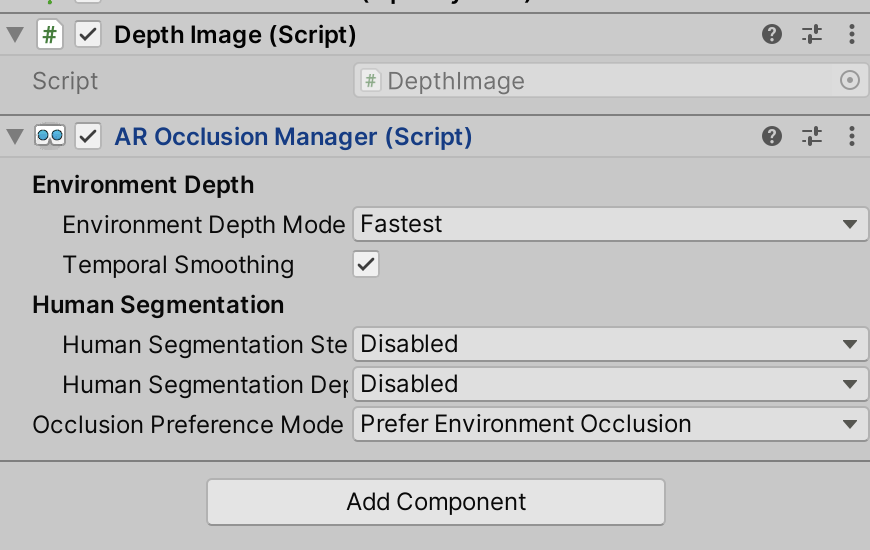
このような形で「Main Camera」の「Inspector」に「AR Occlusion Manager」が追加されればOKです。
実機テスト
それではiPhoneの実機で検証しましょう。
ツールバーの「File」→「Build and Run」からビルドを実行します。
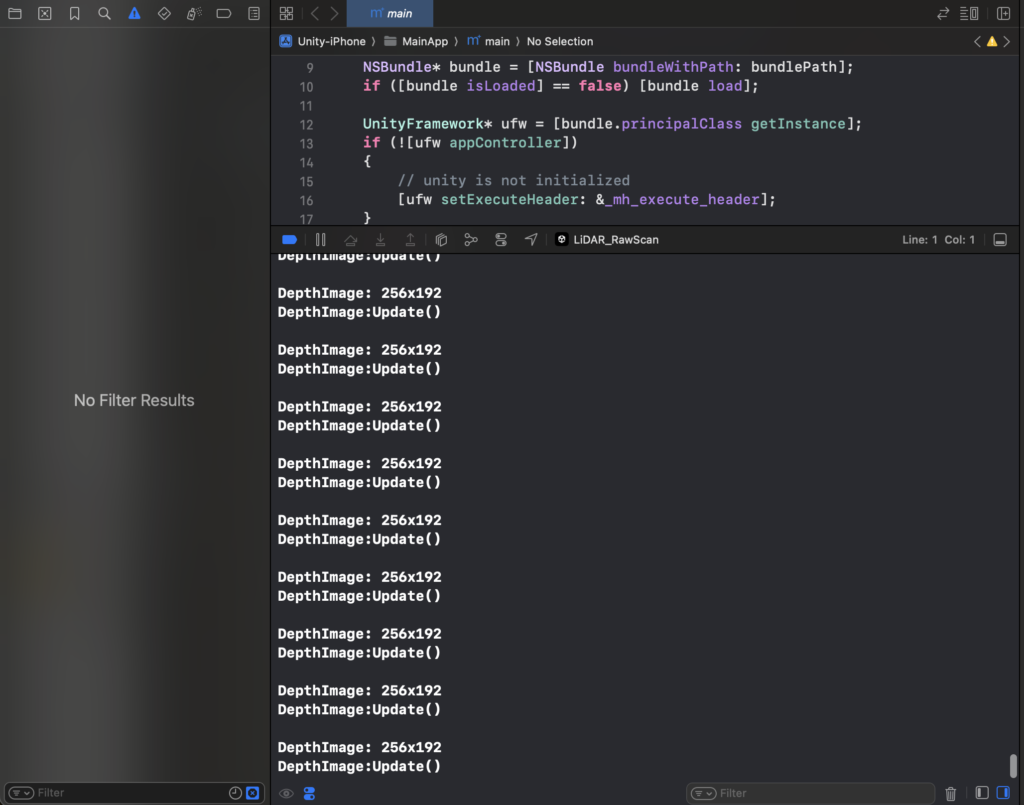
実機ビルド後、XCodeでログを確認すると、このように「256×192」のサイズで深度画像(Depth Image)を取得できていることがわかります。
深度画像の保存
次に得られた深度画像をファイルに保存します。
深度画像はそのままでは出力できないため、深度画像(XRCpuImage)をバイト列に変換したあと、グレースケールのテクスチャに変換します。
さらに、グレースケールのテクスチャをPNG画像としてエンコードして保存します。
using UnityEngine;
using UnityEngine.XR.ARFoundation;
using UnityEngine.XR.ARSubsystems;
using Unity.Collections;
using System.IO;

[RequireComponent(typeof(AROcclusionManager))]
public class DepthImage : MonoBehaviour
{
    private AROcclusionManager occlusionManager;

    void Start()
    {
        occlusionManager = GetComponent<AROcclusionManager>();
    }

    void Update()
    {
        if (occlusionManager != null)
        {
            if (occlusionManager.TryAcquireEnvironmentDepthCpuImage(out XRCpuImage depthImage))
            {
                using (depthImage)
                {
                    SaveDepthDataAsPNG(depthImage);
                }
            }
        }
    }
    private void SaveDepthDataAsPNG(XRCpuImage depthImage)
    {
        var conversionParams = new XRCpuImage.ConversionParams
        {
            // 入力画像の範囲をそのまま出力する
            inputRect = new RectInt(0, 0, depthImage.width, depthImage.height),
            // 深度画像のサイズをそのまま出力する
            outputDimensions = new Vector2Int(depthImage.width, depthImage.height),
            // ピクセルごとに1つのfloat値を持つテクスチャとする(深度画像のため1ピクセルごとに1つの深度値を持つ)
            outputFormat = TextureFormat.RFloat,
            // 左右を反転する(撮影者から見てiPhoneの長辺が地面に水平の角度かつカメラが左上に来るように持つ前提)
            transformation = XRCpuImage.Transformation.MirrorX
        };

        // 深度データを格納するバイト配列を用意する
        using NativeArray<byte> rawData = new(
            depthImage.GetConvertedDataSize(conversionParams), // conversionParamsから必要なデータサイズを求めて取得
            Allocator.Temp
        );

        // 深度データをバイト配列に変換して格納する
        depthImage.Convert(conversionParams, new NativeSlice<byte>(rawData));

        // 深度画像をグレースケール画像に変換
        Texture2D texture = new(
            depthImage.width,
            depthImage.height,
            TextureFormat.RFloat, // 深度データのため1ピクセルが1つの浮動小数点数を持つRloat型のテクスチャとする
            false
        );

        // テクスチャに深度データを格納する
        texture.LoadRawTextureData(rawData);

        // テクスチャを更新する
        texture.Apply();

        // テクスチャをグレースケールに変換する
        Texture2D grayScaleTexture = ConvertToGrayscale(texture);

        // PNGとして保存
        byte[] bytes = grayScaleTexture.EncodeToPNG();
        File.WriteAllBytes(Application.persistentDataPath + "/DepthImage.png", bytes);

        // テクスチャを破棄
        Destroy(texture);
        Destroy(grayScaleTexture);

        Debug.Log("Depth image saved as DepthImage.png");
    }

    private Texture2D ConvertToGrayscale(Texture2D texture)
    {
        Texture2D grayScaleTexture = new(
            texture.width,
            texture.height,
            TextureFormat.RGBA32,
            false
        );
        for (int y = 0; y < texture.height; y++)
        {
            for (int x = 0; x < texture.width; x++)
            {
                float depthValue = texture.GetPixel(x, y).r; // 深度値は赤チャネルに格納されている
                grayScaleTexture.SetPixel(x, y, new Color(depthValue, depthValue, depthValue, 1)); // グレースケールに変換
            }
        }
        grayScaleTexture.Apply();
        return grayScaleTexture;
    }
}
256×192ピクセル分のデータを毎フレーム保存しますが、最新のデータで更新されます。
そのため、アプリを停止した時点の深度画像が保存されます。
保存された画像を見る
深度画像はiOS端末に保存されますが、そのままでは見ることができません。
アプリごとに保存したデータをiOSのファイルアプリから見れるようにするには、XCodeで設定をする必要があります。
以下の記事が参考になります。
https://qiita.com/ShingoFukuyama/items/e85d34360f3f951ca612
XCodeのInfoタブを開いて以下の2つの設定を加えるだけです。
- 「Application supports iTunes file sharing」を追加して「YES」
- 「Supports opening documents in place」を追加して「YES」
以上を設定してXCodeのビルドを再度実行すると、iOSのファイルアプリで「On My iPhone」の中に自作のアプリのフォルダアイコンが表示されるようになります。
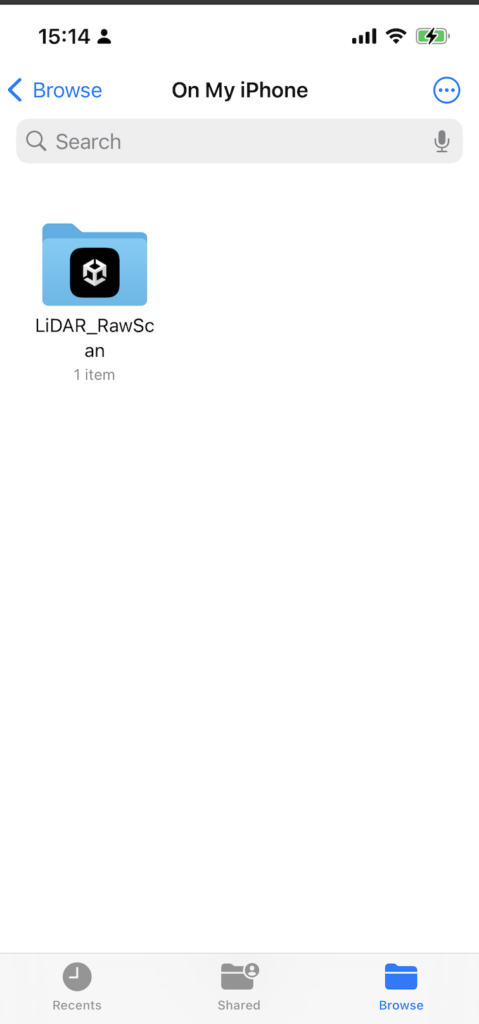
この中にグレースケールの深度画像が格納されています。
参考までに右手を写して取得したグレースケール画像が以下です。
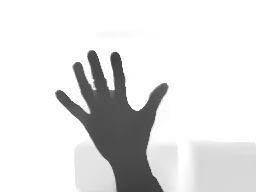
256×192ピクセルなのでRGBカメラ画像に比べて解像度は粗いですが、深度情報を取得できていることが分かります。
深度画像とRGBカメラ画像を対応付ける
次に深度とRGBカメラ画像を対応付けましょう。
iPhoneのカメラ画像のサイズは「1920×1440」、深度画像のサイズは「256×192」です。
カメラ画像のサイズに合うように深度画像をリサイズします。
リサイズにあたって深度画像に存在しないピクセルはバイリニア補間します。
長くなりますが、以下にスクリプトの全体を掲載します。
using UnityEngine;
using UnityEngine.XR.ARFoundation;
using UnityEngine.XR.ARSubsystems;
using Unity.Collections;
using System.IO;

[RequireComponent(typeof(AROcclusionManager))]
[RequireComponent(typeof(ARCameraManager))]
public class DepthImage : MonoBehaviour
{
    private AROcclusionManager occlusionManager;
    private ARCameraManager cameraManager;

    void Start()
    {
        occlusionManager = GetComponent<AROcclusionManager>();
        cameraManager = GetComponent<ARCameraManager>();
    }

    void Update()
    {
        if (occlusionManager == null || cameraManager == null) return;

        if (occlusionManager.TryAcquireEnvironmentDepthCpuImage(out XRCpuImage depthImage))
        {
            using (depthImage)
            {
                if (cameraManager.TryAcquireLatestCpuImage(out XRCpuImage cameraImage))
                {
                    using (cameraImage)
                    {
                        CombineAndSaveImages(cameraImage, depthImage);
                    }
                }
            }
        }
    }

    private void CombineAndSaveImages(XRCpuImage cameraImage, XRCpuImage depthImage)
    {
        Texture2D cameraTexture = ConvertToTexture(
            cameraImage,
            TextureFormat.RGBA32,
            XRCpuImage.Transformation.MirrorX
        );
        // SaveTextureToFile(cameraTexture, "CameraImage.png");

        Texture2D depthTexture = ConvertToTexture(
            depthImage,
            TextureFormat.RFloat,
            XRCpuImage.Transformation.MirrorX
        );
        Texture2D grayScaleDepthTexture = ConvertToGrayscale(depthTexture);
        // SaveTextureToFile(grayScaleDepthTexture, "DepthImage.png");

        Texture2D resizedDepthTexture = ResizeTexture(
            depthTexture,
            cameraImage.width,
            cameraImage.height
        );
        Texture2D resizedGrayScaleDepthTexture = ConvertToGrayscale(resizedDepthTexture);
        // SaveTextureToFile(resizedGrayScaleDepthTexture, "ResizedDepth.png");

        Texture2D combinedTexture = CombineTextures(cameraTexture, resizedDepthTexture);
        SaveTextureToFile(combinedTexture, "CombinedImage.png");

        DestroyTextures(
            cameraTexture,
            depthTexture,
            resizedDepthTexture,
            combinedTexture,
            grayScaleDepthTexture,
            resizedGrayScaleDepthTexture
        );
    }

    private Texture2D ConvertToTexture(
        XRCpuImage image,
        TextureFormat format,
        XRCpuImage.Transformation transformation
    )
    {
        var conversionParams = new XRCpuImage.ConversionParams
        {
            inputRect = new RectInt(0, 0, image.width, image.height),
            outputDimensions = new Vector2Int(image.width, image.height),
            outputFormat = format,
            transformation = transformation
        };

        NativeArray<byte> rawData = new(
            image.GetConvertedDataSize(conversionParams),
            Allocator.Temp
        );
        image.Convert(conversionParams, new NativeSlice<byte>(rawData));

        Texture2D texture = new(
            image.width,
            image.height,
            format,
            false
        );
        texture.LoadRawTextureData(rawData);
        texture.Apply();

        rawData.Dispose();
        return texture;
    }

    private void SaveTextureToFile(Texture2D texture, string filename)
    {
        byte[] bytes = texture.EncodeToPNG();
        File.WriteAllBytes(Application.persistentDataPath + "/" + filename, bytes);
    }

    private Texture2D ConvertToGrayscale(Texture2D texture)
    {
        Texture2D grayScaleTexture = new(
            texture.width,
            texture.height,
            TextureFormat.RGBA32,
            false
        );
        for (int y = 0; y < texture.height; y++)
        {
            for (int x = 0; x < texture.width; x++)
            {
                float depthValue = texture.GetPixel(x, y).r;
                grayScaleTexture.SetPixel(
                    x,
                    y,
                    new Color(
                        depthValue,
                        depthValue,
                        depthValue,
                        1
                    )
                );
            }
        }
        grayScaleTexture.Apply();
        return grayScaleTexture;
    }

    private Texture2D ResizeTexture(Texture2D originalTexture, int width, int height)
    {
        Texture2D resizedTexture = new(width, height, originalTexture.format, false);
        float widthRatio = (float)originalTexture.width / width;
        float heightRatio = (float)originalTexture.height / height;

        for (int y = 0; y < height; y++)
        {
            for (int x = 0; x < width; x++)
            {
                float u = x * widthRatio / originalTexture.width;
                float v = y * heightRatio / originalTexture.height;
                resizedTexture.SetPixel(x, y, originalTexture.GetPixelBilinear(u, v));
            }
        }
        resizedTexture.Apply();
        return resizedTexture;
    }

    private Texture2D CombineTextures(Texture2D cameraTexture, Texture2D depthTexture)
    {
        Texture2D combinedTexture = new(
            cameraTexture.width,
            cameraTexture.height,
            TextureFormat.RGBA32,
            false
        );
        for (int y = 0; y < combinedTexture.height; y++)
        {
            for (int x = 0; x < combinedTexture.width; x++)
            {
                Color cameraPixel = cameraTexture.GetPixel(x, y);
                float depthValue = depthTexture.GetPixel(x, y).r;
                combinedTexture.SetPixel(
                    x,
                    y,
                    new Color(
                        cameraPixel.r * depthValue,
                        cameraPixel.g * depthValue,
                        cameraPixel.b,
                        1
                    )
                );
            }
        }
        combinedTexture.Apply();
        return combinedTexture;
    }

    private void DestroyTextures(params Texture2D[] textures)
    {
        foreach (var texture in textures)
        {
            if (texture != null)
            {
                Destroy(texture);
            }
        }
    }
}
以上のようにC#スクリプトを更新して再度ビルド&実行すると、次のように深度画像と写真を組み合わせた画像を取得できます。
青色の濃い場所がカメラから近い部分で、薄い部分が遠方です。
カメラ画像と深度画像が対応付けられていることがわかります。
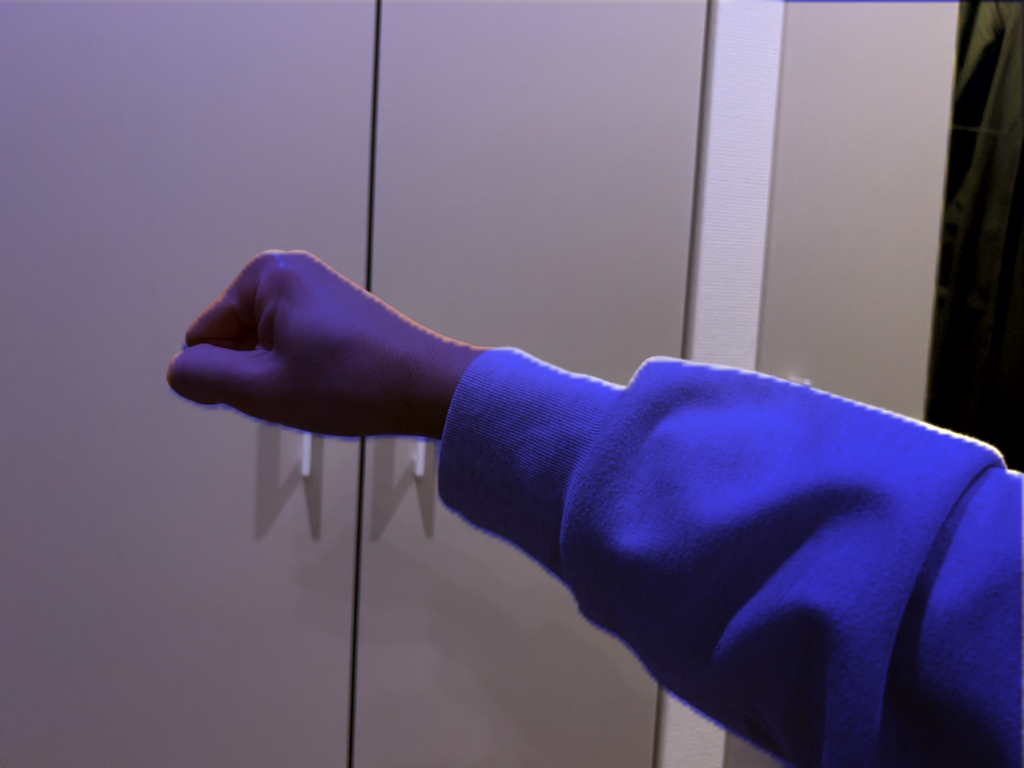
このように深度画像とRGBカメラ画像を重ね合わせることができます。
深度情報から3次元点群を取得する
ここからは3次元点群を取得することを考えます。
Camera.main.ScreenToWorldPointメソッドを呼び出すことで、カメラ画像のx, y座標と深度値からUnity空間の3次元の座標を取得できます。
ここではカメラ画像のサイズにリサイズしたグレースケールの深度画像(resizedGrayScaleDepthTextur)をもとに、ピクセルごとの3次元座標を取得してcsvファイルに出力します。
        Texture2D resizedGrayScaleDepthTexture = ConvertToGrayscale(resizedDepthTexture);

        // CSVに点群データを保存する
        string csvFileName = "point_cloud.csv";
        StreamWriter streamWriter = new(Application.persistentDataPath + "/" + csvFileName, false);
        streamWriter.WriteLine("x,y,z");
        for (int y = 0; y < cameraImage.height; y++)
        {
            for (int x = 0; x < cameraImage.width; x++)
            {
                float depthValue = resizedGrayScaleDepthTexture.GetPixel(x, y).r;
                Vector3 point = Camera.main.ScreenToWorldPoint(new Vector3(x, y, depthValue));
                streamWriter.WriteLine(point.x + "," + point.y + "," + point.z);
            }
        }
streamWriter.Close();取得した点群データをCloudCompareで開いて点群データを確認しましょう。
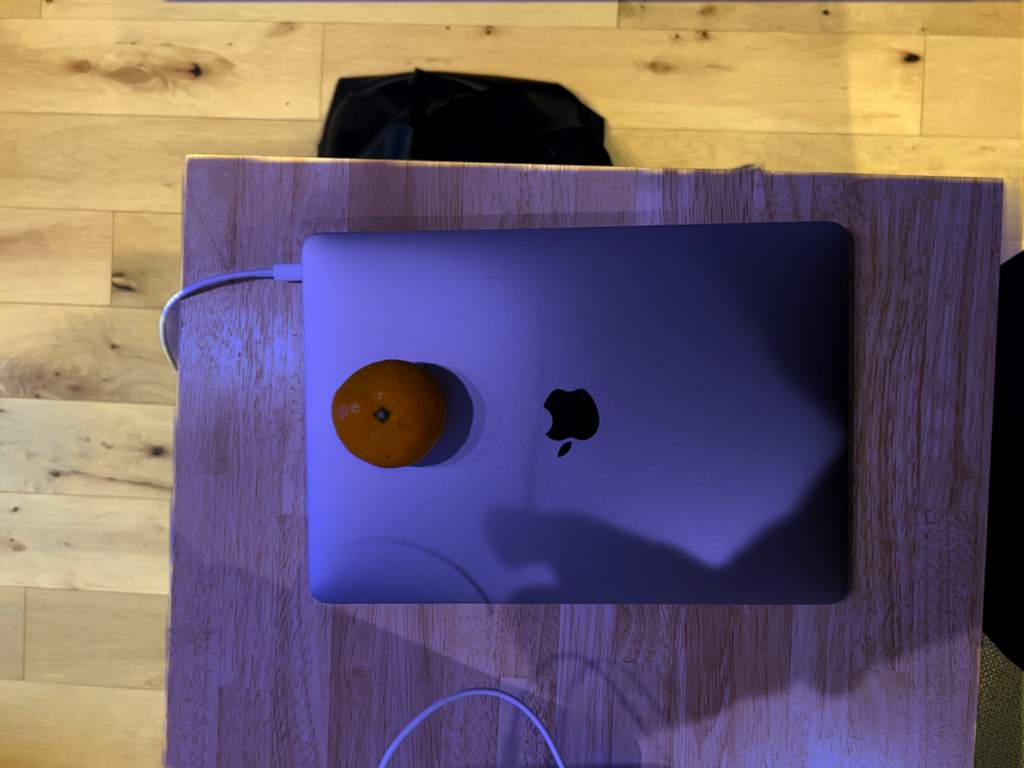
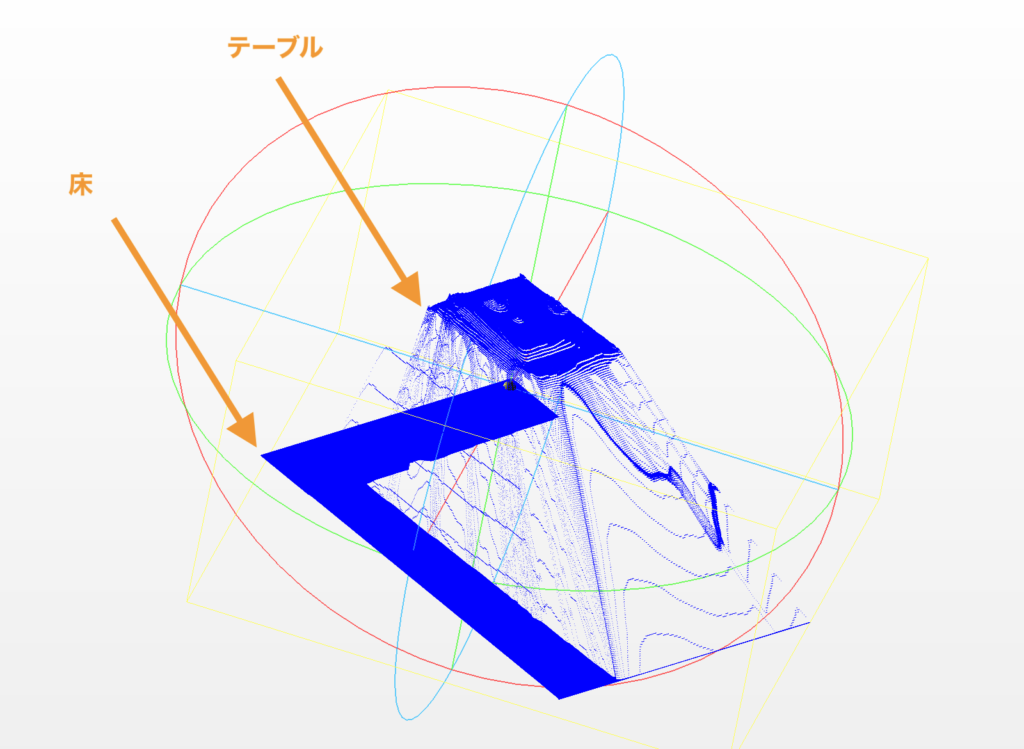
今回は次の画像のようにテーブルの上にMacBookとみかんを置いて真上から撮影したものを3次元点群に出力しました。csvファイルのサイズは約90MBです。
3次元点群データを確認すると、まずテーブルと床が取れていることを確認できます。
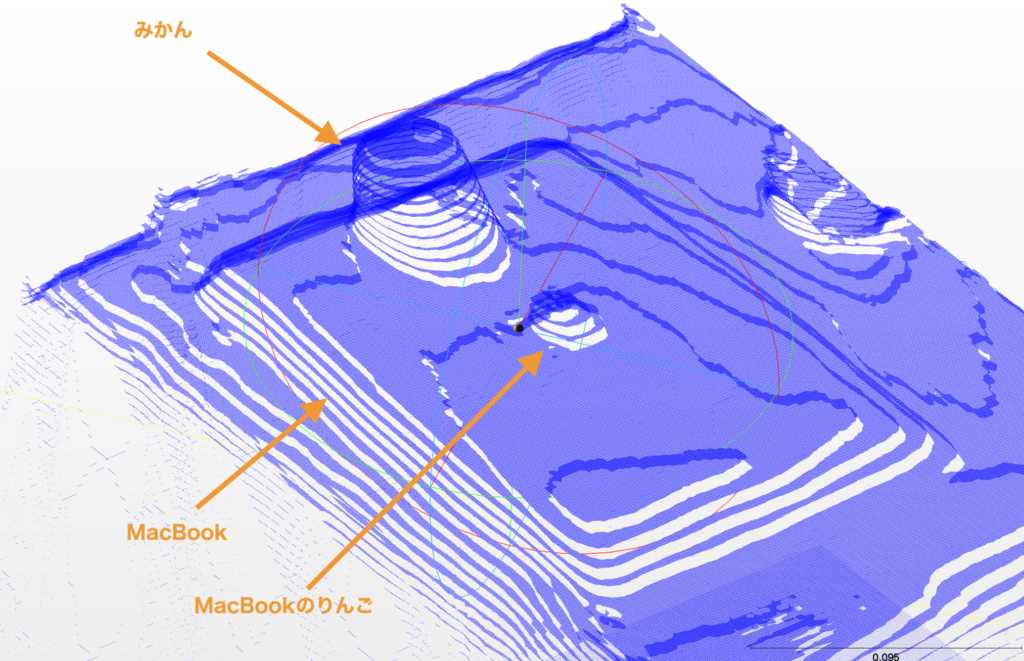
テーブルの上をさらに拡大してみてみると、みかんとMacBookおよびAppleのロゴの形状をなんとなく取れていることがわかります。
ざっとデータを確認すると以下のことがわかります。
- 1フレームだけの点群データを出力しているためきれいなスキャンデータにはならない
- 深度画像をRGBカメラ画像のサイズにリサイズする際にピクセルをバイリニア補間しているためか、等高線のような階段状の点群になる
- 実物のテーブルの縁やMacBookの縁など、エッジ付近では明らかに精度が落ちる
- エッジ付近ではLiDARで見えていない部分に、存在しないはずの点群が生成される
特に深度画像からRGB画像への変換の際に実施しているバイリニア補間の影響か、ところどころ階段のようになっている部分が気になります。
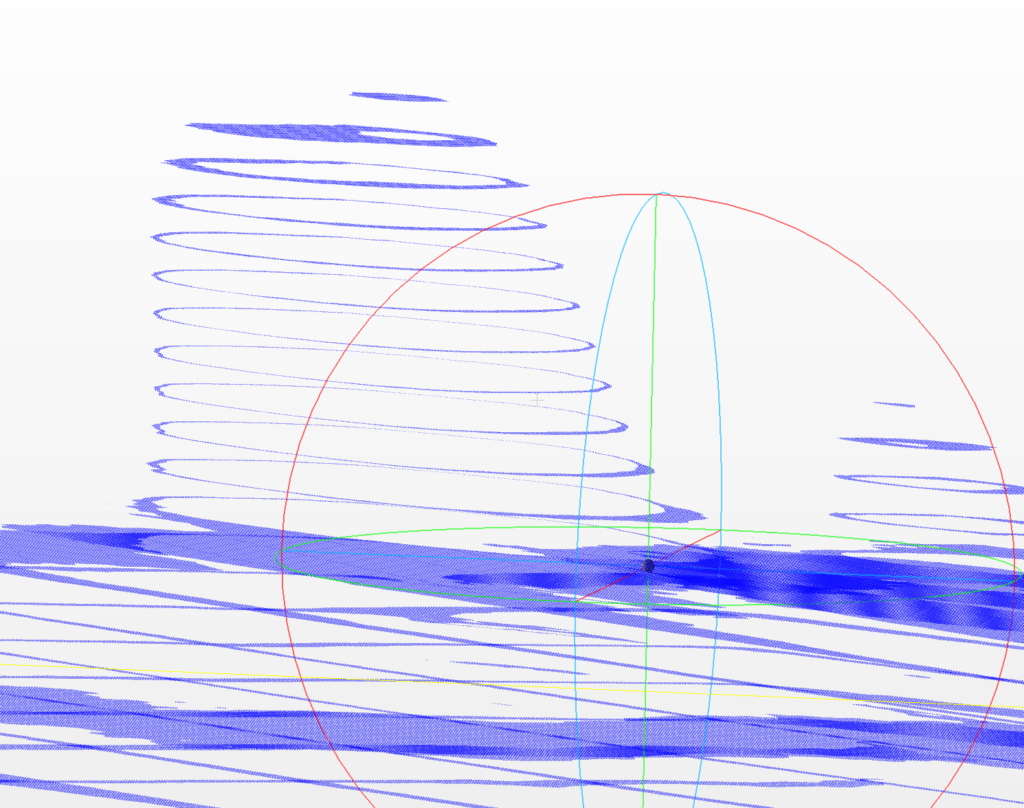
横から見るとみかんがトルネードポテトのようになっています。
補間を入れると頂点数が膨大になり、点群の保存処理も重くなるため、あえて補間をせずにリサイズして、深度画像で取れていないピクセルは破棄することを考えます。
ResizeTexture関数を次のように書き換え、リサイズ後のサイズでは存在しないはずのピクセルを黒色ピクセルにします。
private Texture2D ResizeTexture(Texture2D originalTexture, int width, int height)
    {
        // 新しいテクスチャを作成し、初期色を黒に設定
        Texture2D resizedTexture = new(width, height, originalTexture.format, false);
        Color32[] initColorArray = resizedTexture.GetPixels32();
        for (int i = 0; i < initColorArray.Length; i++)
        {
            initColorArray[i] = Color.black;
        }
        resizedTexture.SetPixels32(initColorArray);

        float ratioX = (float)width / originalTexture.width;
        float ratioY = (float)height / originalTexture.height;

        for (int y = 0; y < originalTexture.height; y++)
        {
            for (int x = 0; x < originalTexture.width; x++)
            {
                Color pixelColor = originalTexture.GetPixel(x, y);
                int newX = Mathf.FloorToInt(x * ratioX);
                int newY = Mathf.FloorToInt(y * ratioY);
                resizedTexture.SetPixel(newX, newY, pixelColor);
            }
        }

        resizedTexture.Apply();

        return resizedTexture;
    }
そのうえで、深度画像からの3D化の際に黒色ピクセルを無視します。
 // CSVに点群データを保存する
        string csvFileName = "point_cloud.csv";
        StreamWriter streamWriter = new(Application.persistentDataPath + "/" + csvFileName, false);
        streamWriter.WriteLine("x,y,z");
        for (int y = 0; y < cameraImage.height; y++)
        {
            for (int x = 0; x < cameraImage.width; x++)
            {
                float depthValue = resizedGrayScaleDepthTexture.GetPixel(x, y).r;

                // 黒のピクセルは無視する
                if (depthValue == 0) continue;

                Vector3 point = Camera.main.ScreenToWorldPoint(new Vector3(x, y, depthValue));
                streamWriter.WriteLine(point.x + "," + point.y + "," + point.z);
            }
        }
        streamWriter.Close();
これで深度画像からRGBカメラ画像にリサイズする際の補間の影響を無視できます。
そのうえで取得した点群データが以下です。
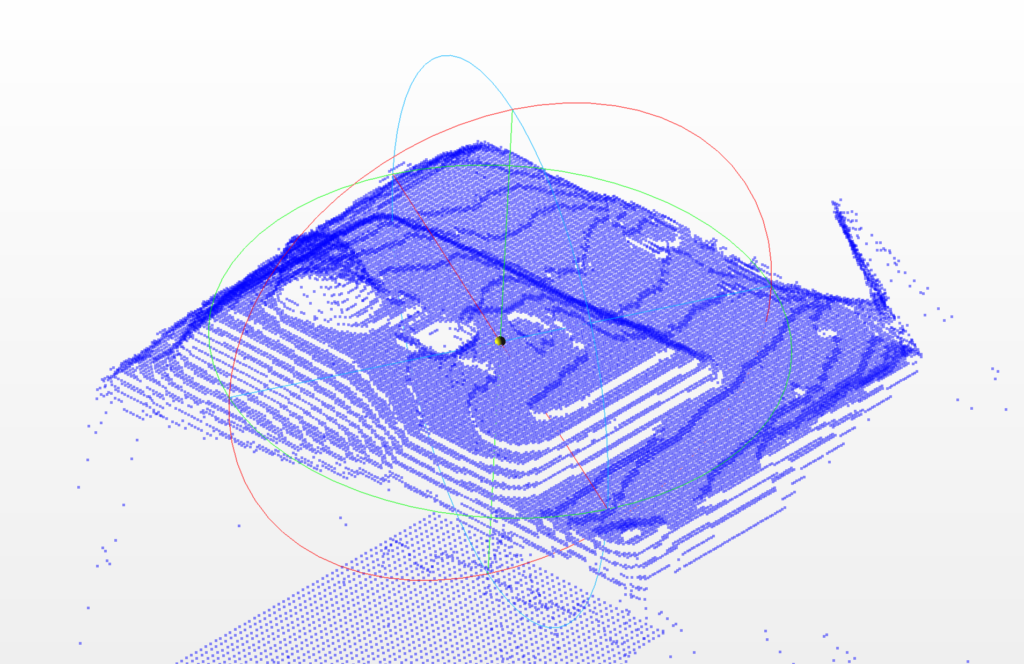
頂点数は49,152(=256*192)ピクセルとなり深度画像のピクセル数に一致します。
これによって処理速度が改善します。しかし、トルネードポテトのような点群になる現象は変わっていません。MacBookや机の上に縞模様があらわれているのも同じです。
これがなぜ発生するのか今後調査する必要がありそうです。
まとめ
この記事では、AR Foundationを使って深度画像から点群データを取得する方法を紹介しました。
当然ですが、1フレームだけできれいな3Dスキャンデータを得ることはできません。
複数のフレームから得られるデータを組み合わせることによって高精度な3Dスキャンデータを作成することができます。
次回の記事では、複数のフレームから得られた点群データから3Dスキャンデータを作成する方法を紹介します。